31 August 2009

Thanks from Erin's mom


Hi, this is Erin's mom. Aren't I just the luckiest - no, blessed - mom ever? I let Erin loose in that dated basement and she created a beauty. Not only was I surprised when I saw the room for the first time, I was overwhelmed and thought about crying. However, Vino was taping the whole reveal and I didn't want to do that on camera. I think it's just wonderful, and I am so grateful, I have no adequate words to express myself. Thank you, sweet Erin!

26 August 2009

Family Room Makeover Projects

This is my third & final post about my mom's family room makeover. You can see the other posts here and here. To refresh your memory, here's the before:


And the after:


I want to talk in this post about the on-the-cheap projects that I did in the room. 
  1. slip covers
  2. ottoman & coffee table turned bench
  3. giant lamp
  4. tchotchkes
  5. old windows on the wall
First, slip covers. They're not actually as cheap as I would have liked them to be. If I had the time, I probably would have custom made them myself, but they are rather time consuming. Plus, my mom wanted the SureFit ones. So we ordered them from Overstock.com. Here's what's really covering the wingback chair:
 
And here's what it looks like covered. Major change that took about a minute to make:


The next few projects used items I found at thrift stores & Hobby Lobby. Here they are in all in all their pre-makeover glory:


Let's talk about that ottoman/coffee table! Forest green with a not so lovely pleather upholstered top. Bought for $45 at a thrift store. All it needed was a coat of paint (leftover from another project) and some brown burlap. Good as new! Now there is a place for everyone to put a beverage, store the remotes and rest their feet.

I also painted the coffee table that was originally under the entertainment center. This is a piece that I grew up with. It used to be in the living room. Memories! But...it wasn't so sacred a memory that I couldn't alter the piece. I painted it & took the decorative 70's wood molding off the front & replaced it with lattice strips to look like a shaker style. I used some caulk on the edges of the lattice strips after I glued them on & before I painted everything. They're not perfect, but no one here really cares that much. :)


This little vignette is one of my favorites. That lamp really makes the space. Here's what it looked like before I painted it white:


What's up with that? It's got some sort of Asian looking house motif at the top, bald eagle & American flag crest in the middle, and French fleur-de-lis. Huh? Anyways, I spray painted the whole mess white, hoping that no one would look too closely at the designs. They're still there, but don't look quite as bad in white!
 

The huge burlap drum shade was the whole reason I bought the lamp anyways. That, and because it was half off that day at the Goodwill! I got two lamps that day for $6 in total.


To balance out the lamp I hung three ironstone plates that also came from Goodwill.


These are the two things I found at Hobby Lobby at 80% off. I think each was about $2. The thing on the stick goes in an open frame. So this is what they looked like before I painted them white.


I ran out of spray paint before I was done painting the artichoke thingy, so I touched it up with white primer (the only white paint I had on hand).


Here's the thing on the stick, painted white & in the open frame. It fits Perfectly on the ledge, and I didn't even measure! It looks nice between the giant windows. Speaking of those windows...

On the long wall, I wanted something BIG to break up the space. My parents had these windows stored in their barn. Lots of them. My dad pulled down two of them. They were covered in inches of dust, dirt & grime. I hosed them off in the yard, let them dry over a few days, and brought them inside to hang. 


I screwed eye hooks into the tops of the windows (actually, the bottoms - I hung them upside down so the handles wouldn't be a temptation for the grandkids to hang on), then I screwed long hooks into the wall at the same distance as the eye hooks. In this particular room, there is 2x4 running the entire length of the room at the top of the wall, so I didn't have to look for studs. If you do something like this yourself, make SURE your hooks are screwed into studs. If I were to do this over again, I would have put the eye hooks in the wall and the long hooks in the windows. Take my advice! They would have been MUCH easier to hang that way. As they are now, Vino had to help me and it was pretty awkward to hang them.


Thanks for staying with me through this whole family room makeover tour! We're already on to the next big thing...

We bought a house! It needs "some work". We've already done a lot of work on it and there is SO much more to do. So, that will be the next huge project and most likely the subject of the majority of my blog posts for a while. Can't wait to start posting about our new old house!

25 August 2009

Family Room Makeover AFTER

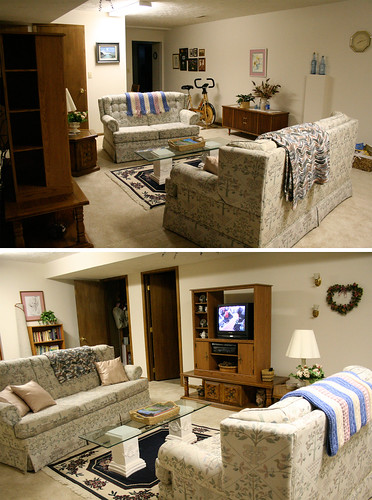
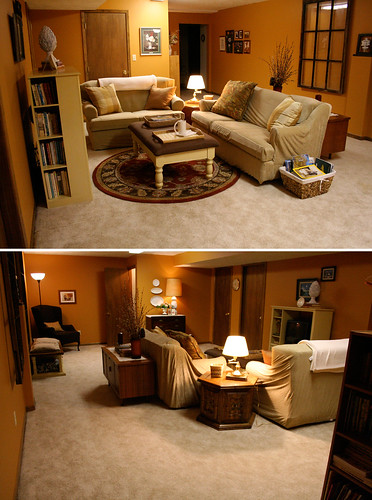
I finally uploaded all of my family room makeover AFTER photos, and here they are! Remember, my mom asked for warm & cozy in this bland, windowless space. You can see the before photos here. The budget was $500-ish. I ended up spending about $520. The money was spent on paint, accessories, slipcovers & one piece of furniture. Everything else was already in the room or shopped from other rooms in the house (and the barn!).


My mom was SO surprised with the results. It wasn't anything like she expected. She was at Tuesday Morning when I picked out the throw pillows, so she knew the palette. She also had an idea of the wall color, but didn't realize how bold it would be. We picked out the slipcovers together. She had originally wanted red but I talked her out of that. :) My reasoning: if she had neutral slipcovers, she could change the rest of the color scheme & style for a small amount of money. They are from SureFit, but we ordered them from overstock.com because the price was cheaper & the shipping was only $2.99. They don't fit as well as the photos on the packages, but they're better than the befores!

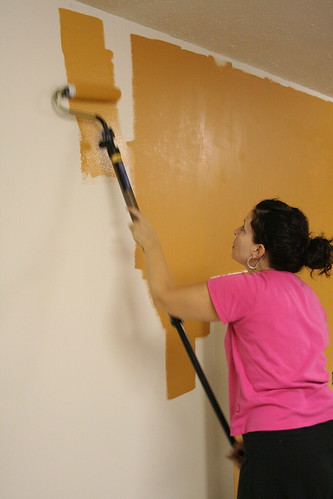
The biggest, most dramatic change is the wall color. It is Behr Mulling Spice. I did two coats of Behr's Flat Enamel. Being a flat paint, it has a velvety texture & hides flaws in the wall better than a more shiny surface. And unlike other flat paints, it's scrubable. I'll definitely use it in my own house!

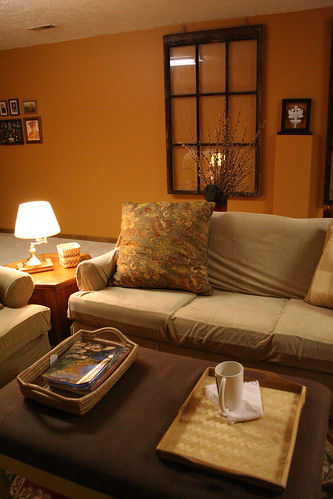
The second biggest change is the furniture arrangement. Before, the sofa & love seat faced each other with a narrow glass table in between. The tv was in an old entertainment center that was sitting on top of another old coffee table. I moved the entertainment center onto the floor where it belongs, but kept it on the same wall. The sofa & love seat are now in an L-shape. This opened up the tv area & allows people to watch tv sitting front-ways on the couch instead of sideways.


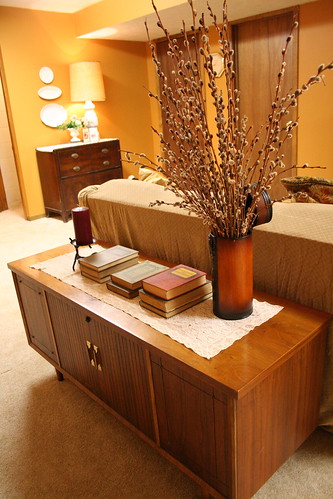
I moved the cedar chest to serve as a sofa table. All of the accessories on the chest were found in the house.


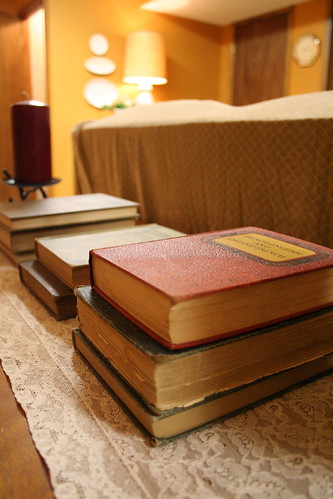
I found a box of old books in storage & stacked them throught the room. I picked them for their color!


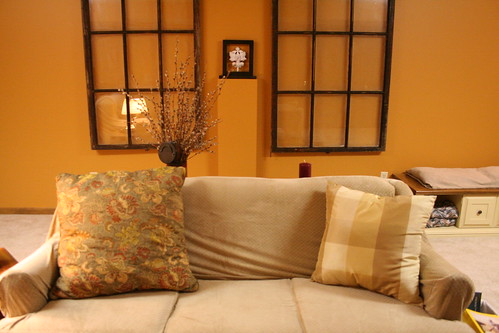
These two old windows are from my mom's high school. My dad has lots & lots of these stored in his barn. They have been up there for years, and they were NASTY. I hosed them off & cleaned them up before hanging them on the longest uninterrupted wall. Now the room has windows! That thing in the middle has some utility stuff inside. I decided to make it a pedistal for a sculptural element I got at Hobby Lobby 80% off. Score!


The big pillow on the sofa is what I used to create the color pallete. I took it to Home Depot to find a wall color to match.


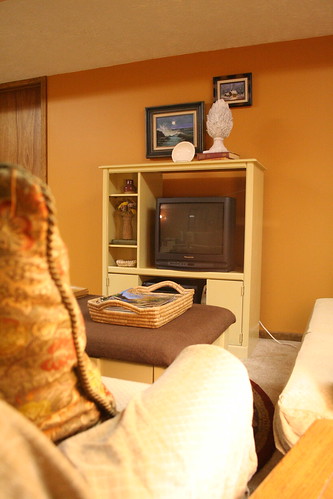
I painted the old entertainment center with some leftover wall paint from a different room in the house. There was more than enough to paint three pieces of furniture.


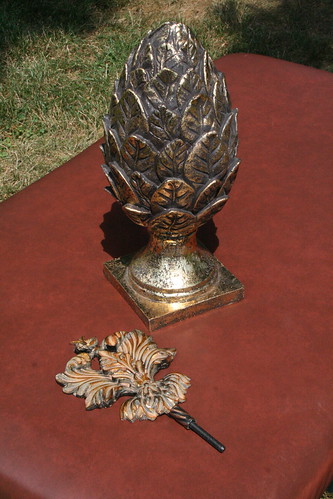
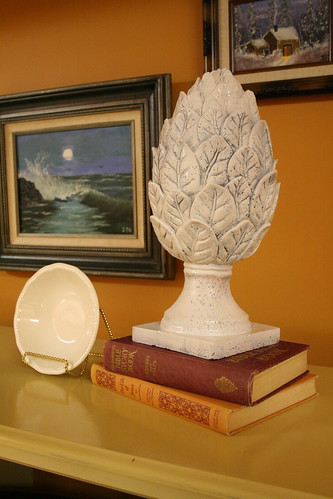
I purchased the big artichoke looking thing, also 80% off at Hobby Lobby, and spray painted it white. The white ironstone bowl is from Goodwill.


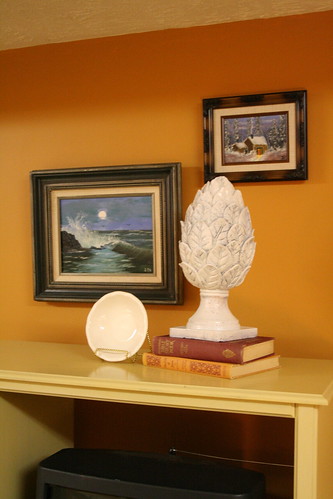
More books, and the paintings were already in the room, done by my grandpa.


Love this rug. I think it's too small for the space, but it was the one that went best with our color pallette. It is also from Tuesday Morning, and was the most expensive item in the room at $199.


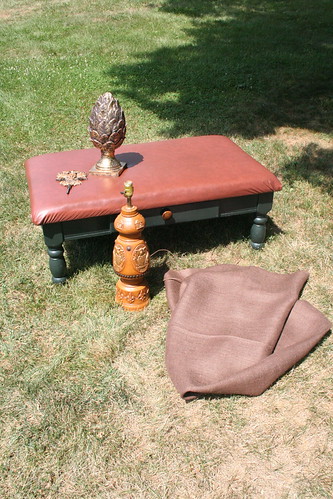
I found the ottoman/coffee table at Savers, another thrift store. It was not very pretty - dark green with tan pleather upholsery. I painted it & re-upholstered with brown burlap.


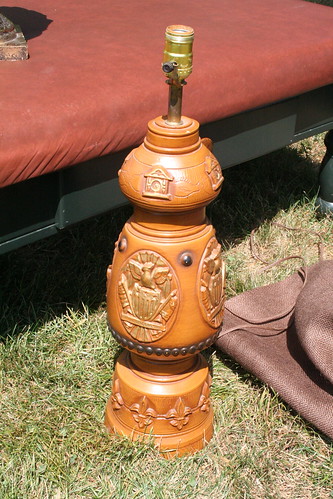
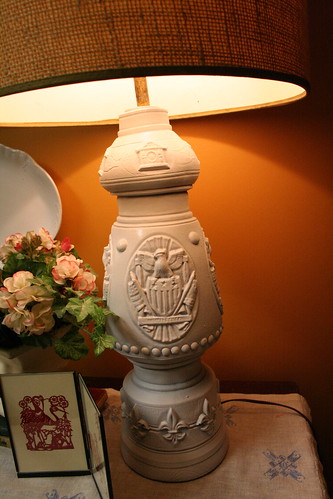
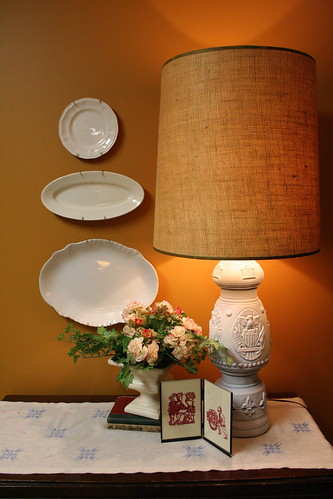
I love this vingette! The furniture piece is an old radio/record player. I don't think it works, but it looks great! The plates & the lamp are from Goodwill. The lamp was hideous before I spray painted it white. It was the giant burlap drum shade that called to me from the thrift store shelf.


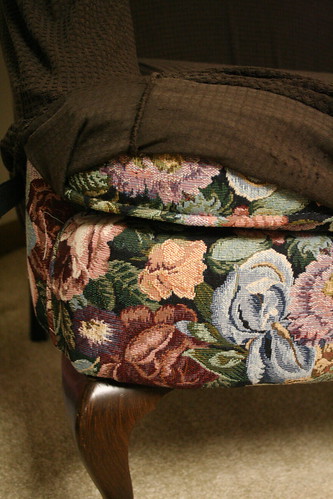
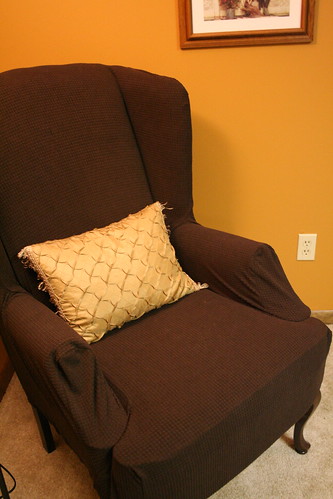
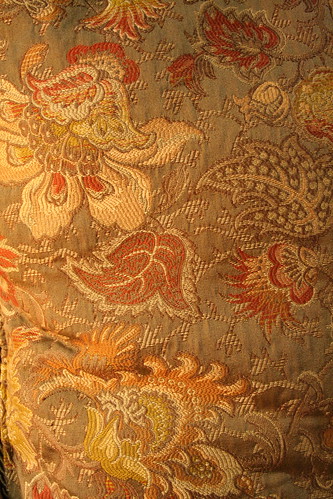
Here's a little reading nook right at the bottom of the stairs. The wingback chair has an unappealing floral brocade fabric under the slipcover. The lamp was only $8.99 at Walmart!


This is the old coffee table that was originally under the entertainment center. It looks SO much different painted! I pried off the 70's wood detail on the doors & replaced them with lattice strips to give it a shaker style. I should have spent a little more money on a cushion for the table turned bench. As it is now, it's just a body pillow cover stuffed with two bed pillow. Very ghetto. I'm not proud of that detail. :)


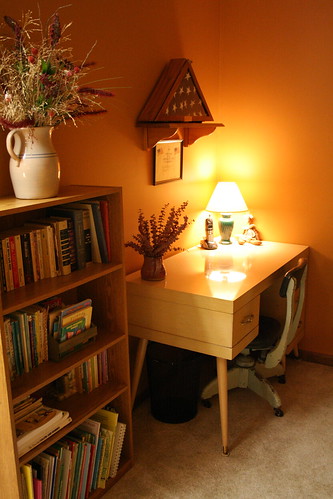
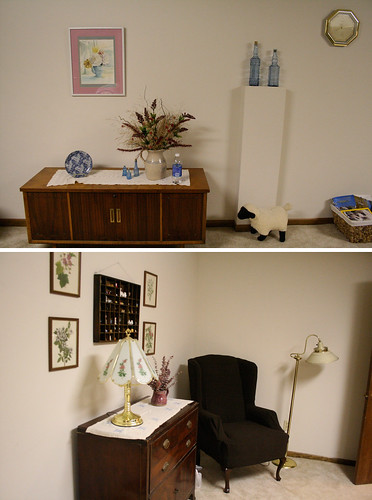
This corner didn't show up in the before photos. I moved the bookshelf here from the other side of the room, but basically everything else is the same as it was before. It just looks better with the warm wall color and a little lamp!


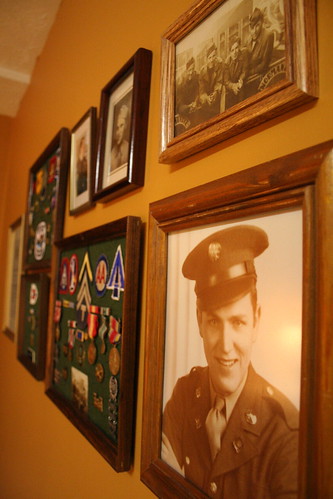
I love this collection of photos, medals & certificates from my grandpa Irl's time serving in the army during WWII. The flag over the desk is from his funeral. He's the same grandpa who painted the pictures over the entertainment center.

I worked for several days on this project, most of it painting! I did spend a lot of time shopping trying to decide what I should & shouldn't get. I did a lot of projects that I will detail on another day, hopefully soon.

Do you like it? Have you done a makeover lately? Do share!

22 August 2009

Family Room Makeover BEFORE

My mom has good taste. Her house is very homey, clean & restful. However, even though she enjoys decorating herself, she has asked my sister & I to re-do three of her rooms. She give us her preferences & a budget, and then she doesn't see the room until we're finished. First was the main bathroom, which I re-did in a cool, bright spa theme. Then was the upstairs guest room, which my sister & I re-did in a warm, British colonial style. Well, that was our starting point at least. It turned out warm & cozy. She loved both rooms!

The most recent makeover was the basement family room. For years it was a hodgepodge of leftover furniture pieces from days gone by. She wanted another warm, inviting, cozy room. The challenge: it's huge! LOTS of wall space. $500-ish budget. She also requested SureFit slipcovers for the couch & loveseat. Here are the before pictures!


And here's a sneak peak at some of the things I bought for the room, pre-transformation:


Another sneak peak - wall color! It's BOLD, and I worried a bit if my parents would like it. The rest of the walls in the house are very pale. Risky!!

I will post the AFTER photos soon & talk about the projects I did & how I saved as much money as possible. I love how it turned out!

15 August 2009

My Foray into Senior Photos


This week I agreed to take senior photos for my niece & nephew. I wasn't sure how they would turn out, since I have no idea what I'm doing with my camera. But I'm actually pretty happy with the results. All of the photos were taken on their farm. They both compete in horse shows, so their horses had to be included!


This is my favorite shot of Keisha with her horse, Twister.

I was very happy with the angle of these shots.


I was experimenting with back lighting. Don't know if I was completely successful or not. Again, not quite sure how to use my camera!


I LOVE the photos with the grain bin. I'm really drawn to the horizontal lines. AND, the shape of the bin gives the illusion that I have a wide angle lens. :)


This is our tongue in cheek version of the senior portrait with the fancy car. Keisha was recently in a roll-over accident in her Jeep and was VERY blessed to come out of it with only minor injuries. I told her mom that this is her miracle shot!


I studied the sites of two photographers I know. I love their styles & used their photos as inspiration. Becky Novacek Photography in Omaha, NE & Khara Plicanic @ Kabloom Studios in Lincoln, NE.


This shot was a direct rip-off of Khara's shot in this blog post, although hers is much more dynamic!


I had so much fun, even though I was nervous that nothing was going to turn out right. Thanks for giving me a chance to take your photos, Randy & Keisha! Check out the rest of my favorites from this photo shoot here. What do you all think? Suggestions for what to do better next time? Comments? Let me know!